ROTORBLADES
The following review has been reprinted from
the May, 1997 issue of Rotorcraft magazine.
Evaluation Report:
The New All-Aluminum Extruded Rotor
by Ed Alderfer
Since October, 1996, an ad has been running in Rotorcraft for smooth extruded rotorblades with no seams, rivets or skin wrap. This article will share with you my making up and test flying a set on our gyroplane.
Who did the extruded blade design?
Mr.
Fleck is the name of the man who created the design and technology of this new
extruded rotor blade. They had extrusion dies made of the 0012 airfoil for
helicopter rotors and the 8-H-12 airfoil for autorotating gyroplane rotors with
chord widths up to eight inches. Smaller-chord widths are also available for
tail rotor blades for helicopters.
A newly-formed company, Vortech
International, purchased the design technology, manufacturing and marketing
rights from the blade’s creator.
The Fleck extruded rotors are easy to care
for—No rivets or seams. The root and tip
end caps are molded plastic inserts.
Redundancy design and materials
As you
can see from the photos, the inner support has a beefy non-crushable area at
the quarter-chord area, and three additional beefed-up airfoil supports that
make the blade the most sturdy, stiff and straight blade imaginable. Remember,
the blade is all one extruded member except for the full-length slip-in
extruded bar/spar/noseweight, the full length of the blade inside the leading
edge.
This bar serves two purposes: 1) a redundant
independent member spar that’s a light press slip fit that’s liquid
epoxy applied as it’s inserted in the leading-edge opening of the blade;
2) the bar/spar weight is the quarter-chord noseweight.
The blade material is 6063-T6 aluminum. The bar/spar/noseweight is 6061-T6
aluminum, as is the top filler plate that levels the top rounded airfoil to the
flat area.
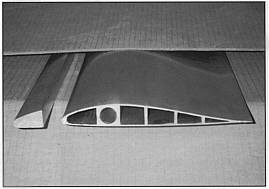
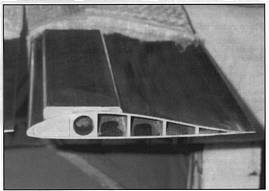
Here's a close look at the bar/spar/tipweight and the rotor
blade airfoil 8-H-12. Note the beefy inner support that gives
the blade stiff strength.
Building my extruded rotor
I've been
mesmerized with rotors since building my first wood rotor in the early years,
way back. I've been very blessed (or unblessed) with flying every make gyro
rotor ever made. I've torn up eight sets that I can remember, and probably have
worked on and gotten flying smooth more rotors than anybody except my mentor
and late good friend, Bill Parsons, or maybe Ernie Boyette.
I knew what I wanted in a
rotor: 1) Hand startable, 2) Good lift on marginal power, 3) A strong rotor
that has redundancy, 4) no droop and will stay in track perfectly and
permanently, 5) A stately look, 6) Smooth, less drag, easy to care for, 7)
Economical price.
After over 100 hours flying my
extruded rotor on a single-place, a two-place tandem, and now on a two-place
side-by-side, the rotor has met my goals and accomplished all seven items
mentioned above. It has made me enthusiastic enough to put forth the effort to
share my success.
From experience, I knew I wanted to:
1) build a hub bar with a one-degree positive blade pitch, and 2) have a
two-degree upward coning angle.
These degrees were
milled into the hub bar to eliminate the adjusting blocks and bolts that add
expense and weight. This done, I had my wife, Bernadine, help me paint on the
thinned epoxy while I slid in the bar/spar, then epoxied on the top
filler-leveler plate exactly over the quarter chord.
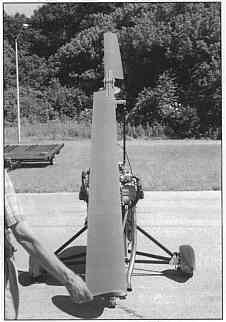
I
made four blade straps from 4130 steel .125” thick, 21½” wide
by 17½” long. This gave 12½” on the blade and 5" on the
hub bar. I used four-inch bolts in the blades and two-inch bolts in the hub
bar. I put three 3/16” bolts through the straps, the blade and the
bar/spar for retention (See photos).
Building one set without jigs is time consuming, including layout and rechecking everything for accuracy before drilling holes in the blades and straps. This part is very critical and blades will never fly smooth if the alignment and workmanship are not perfect. The blades must be in perfectly accurate chordwise position and perfectly accurate string alignment, and all this propped up to the coning angle, to transfer the permanent holes. It’s easier to write about it than do it!
The blade has bar/spar and top leveler plate epoxied in
place. The quarter chord is at the round beefy area.
All the fine-ness and fussing
and rechecking it did me good. After bolting it all up and checking the string
alignment, it was perfect.
Static balancing was the
next step. I had to add a short 3/16” pan head with four small washers to
the tip of the light blade. Next I installed molded plastic root and tip end
caps. The have tabs that insert into the blades. A small drilled hole and pins
epoxied in hold the caps.
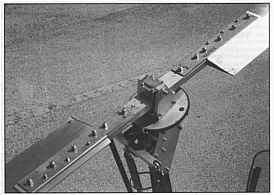
Here are the complete blades with hub bar straps and bolts in position. Note the filler plate under the top strap to level the airfoil curve. Three smaller bolts go through the bar/spar as retention insurance. The black plastic end inserts fit perfectly.
Too good to be true?
If there is a
shortcoming to this new rotor, it will be the do-it-yourself hub bar and strap
building. Not everybody has the know-how to accurately do this and end up with
a good-flying smooth rotor.
But anyone who has good
work habits, a good drill press, is not in a hurry, understands chord balance,
spanwise balance, positive pitch, coning angle and tracking, can do the job if
he wants to bad enough.
Get a machine shop to mill the hub bar and make a
teeter block.
The length of my extruded rotor with
12-foot blades and a 20-inch hub bar totaled 25 feet 8 inches. Weight 72 lbs.
The weight is equal to the same length of other popular rotors. The extruded
rotor can easily be cut to any length you want.
Test flight and first checkout
I put
the rotor on a single-place first and rolled it outside. A gentle breeze was
blowing. I hand started the rotors real easy-like. They gained rpm real nice
with no effort. That’s the reason I choose one degree positive pitch. I
stopped the rotor, checked the gyro over, started the engine and gently armed
the rotor a little, got in and taxied out.
The rpm
picked up quickly. Tracking looked good at about 200 rpm, so I went on out on
the runway. I lifted off real easily. I liked what I felt, the track was within
¼” so l took her on up and stayed up 45 minutes. No surprises.
There was very good lift and they were very responsive. To me it seemed like
they turned faster, but I had no tach.
The next morning I transferred the new
extruded rotor to my two-place. I took off and never landed for over two hours.
It was flawless, the smoothest great lifting rotor I had ever flown.
This machine had a rotor tach and rotor rpms were a fast 395 to 400.
Since that testing stage, eight months have passed. Mentone,
Shelbyville, Mountain City,
hundreds of flights and training hours have proven this new rotor has it all,
strength, great lift, redundancy ease of maintenance, hand startable, and a low
price.
The blades are being sold by Ben
Showers Aero, authorized distributor for Vortech International. See their ad in
Rotorcraft.
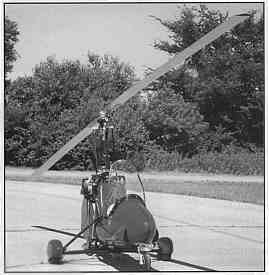
The extruded blades are straight and stiff. No droop gives an impressive strong look. They stay in track.
More rotor talk
If you don't have the roll adjustment
for track like on SkyWheels or Rotor Hawk, the easy way to adjust track on a
fixed hub block is to shim one side or the other under the block. If it’s
out of track about one inch it will need about .020” shim. If it's
¼” out, about .005”, etc. This is the trial-and-error method,
so keep a record until you get it right.
I have never
met a rotor that could not be made to fly smoothly, unless it was really so far
off with bad layout and workmanship. If you have the patience and are willing
to adjust, then fly, adjust and fly, sometimes a whole weekend. No kidding, ask
Bernadine!
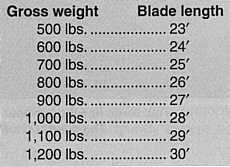
My formula for weight and length of a rotor
is really easy. For good performance even on 90-degree days.
A shorter rotor that lifts well will work, but if you like to float on
landing and touch your wheels feather soft, stick to the formula [below]. Keep
your blades clean of dust and bugs and they will lift their best.